
Wall panelling is the latest trend taking over TikTok and bedroom walls everywhere. And with their striking effect and incredibly simple design, it’s no mystery why. From bland backsplashes to cold corners, the wooden wall panels create sophisticated spaces that’ll have all your visitors in awe. And the best part? Anyone can do them!
You don’t have to be a trained carpenter or talented woodworker to achieve a bespoke wood panelling look at home. With a few affordable materials and a bit of elbow grease, you—yes you—can craft a stylish wall that’ll turn heads for decades.
So, welcome to amateur hour and make yourself comfortable as we take you through the ins and outs of DIY wall panels. Let’s get stuck in!
Is wall panelling cheap?
Yes! Apart from a lick of paint, wall panelling is one of the most affordable ways to elevate an ordinary space. It's perfect for adding a touch of style to a bedroom, kitchen or even the living room. Plus, it can also be used to cover up any imperfections in your walls.
Today, DIY wall panelling kits are readily available from most hardware stores, or if you're a die-hard DIYer, you can buy the materials below and create a striking wall feature without going over budget.
What can I use for DIY wall panelling?
For DIY wall panelling, you will need the following tools and materials:
- Pine/MDF strips
- A bubble level
- No Nails Glue
- Decorative caulk
- Mitre box and saw
- Pencil and paper
- Sandpaper or an electric sander
- Natural wood sealant
- Paintbrush
How to panel a wall in 5 simple steps
Step 1: Measure and mark out your panels

First, you'll need to mark out and measure your panels. It's important to be precise here, as even a small error can throw off the rest of the project. For the perfect size panels, measure the length and width of your wall. Then, calculate how long each panel will need to be and how many you’ll need depending on the size gap you want between each panel.
Once you know how many pieces of wood you need and the correct length, measure each of the strips of pine or MDF and mark where you will need to cut them with a pencil. To make this process faster, you can measure and cut one and then use that piece to mark the rest.
Step 2: Cut your panels to size
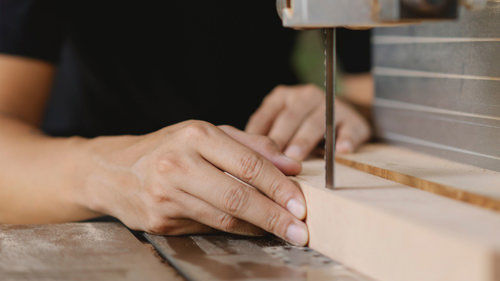
Next, cut your panels to size using a saw. If you're working with solid wood, you can use a hand saw or power saw; for plywood or MDF, a power saw is best. Be sure to wear safety goggles and gloves while cutting.
If you do not have a power saw, buying a mitre box and using an ordinary hand saw is an inexpensive way to get perfectly precise panels every time. Simply mark out the desired length, hold the piece of wood firmly in the box and cut!
For a thicker wood, get someone to help you secure it in the box to avoid losing grip mid-saw, or worse, a finger!
Step 3: Sand and seal the panels
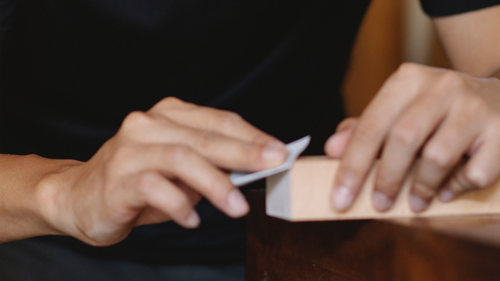
With your panels cut, it’s time to sand and smooth all those rough edges. An electric sander is ideal, but if you don’t have one lying around, buying a piece of sandpaper and gently sanding by hand or with a sanding block is just as good!
You’ll want to use #220 grit sandpaper or higher for a smooth finish. This will help smooth out any rough edges and ensure that the sealant adheres properly. Once you've sanded the panels, apply the sealant. Some people prefer to do this last, but if you don’t want to ruin your floors and have drip marks running down your panels, we’d suggest doing it before.
Choose a sealant that is designed for use with wood, and apply it according to the manufacturer's instructions. Allow it to air dry for the recommended time and then you're ready to install your wall panels!
Step 4: Install panels to the wall
For a simple DIY wall panel design anyone can do, glue each piece of wood next to one another with a small gap between them. First position them on the wall to see what size gap will look the best. Generally, a 1 centimetre gap or smaller creates the best effect. A smaller gap is also a good idea if you are using the wall panels to cover up imperfections.
To ensure the panels are perfectly spaced, use a bubble level and a spacer. You can create a spacer by using the offcuts of the wood and sawing off 2 or 3 small pieces that will fit in the gap.
Glue the first piece with the no nails glue and apply pressure until it is secured to the wall. Then, position the next piece, placing your wooden spacers less than a metre apart in the gap. Continue the process until all the panels are installed.
Step 5: Touch up any imperfections
Once all your wall panels have been installed, take a step back and observe the final product for any rough edges, glue marks and so on.
Check to see if there are any noticeable gaps between the wall and the wooden strips and fill it with decorative caulk. If you want to add a light coat of sealant to finish it off, this is a good time to do it.
If you need a safe, affordable and convenient space to store costly or sentimental items while you create the perfect panelled wall in your home, look no further than Storage King. With centrally-located facilities countrywide, flexible lease agreements, and a wide range of personal storage solutions, we have all you need to enjoy a stress-free storage experience.
To learn more, pop into your nearest store, give our friendly team a call on 0800 0852 954 or request a free online quote.


